Wednesday, November 5, 2014
WIP Wednesday: All The Yarn!
Last night a friend came over because I wanted to wind two hanks that I was planning on knitting into another warm and fuzzy cowl. But once you have the swift and winder set up, you might as well ball every hank in the house. I knew about two of these, but apparently I subconsciously hoard yarn, so I kept pulling hanks out of bins in my sewing area. Surprise!
And, yes, those pinks are as neon as they look.
So today, I'm knitting up the two balls that started it all. They're a really strange color. It's chartreuse, and fuchsia, and lilac. Pretty much so ugly it's pretty again. And it's Malabrigo, so it's super soft. The pattern is Thirty-Eight by Jane Cochran on Ravelry. It's all seed stitch and ribbing, which is not my favorite way to knit, but I love the texture, so I'm stuck with it.
Linking up with Freshly Pieced for WIP Wednesday!
Tuesday, November 4, 2014
Wanderlust Honey Cowl
Well, anyway, today I decided to just get back at it. I looked down, and there was my Honey Cowl, all fuzzy, warm, and unblogged! Perfect! I tossed it on the girl, grabbed my camera, and made grand promises about leaving a bag of Halloween candy unprotected on the table (models always demand candy in their green rooms).
This is one of my favorite knits so far (so favorite I made sure to add it to my Ravelry page). It was quick and easy, but it's still pretty. And the yarn is a...ma....zing. It's Madelinetosh Merino DK in Cosmic Wanderlust. I bought it as my souvenir from Purl Soho on a trip this summer, and there's still one more ball to make into a hat.
Or I might have to just make a second Honey Cowl for the little girl. She loved wearing it and it's so cute on her! And seriously, I'm completely unable to say no to this face.
Cheers!
Monday, October 6, 2014
The Trouble with Tula...
I bought this layer cake the second it hit the shop. I'm obsessed with Tula Pink because her prints look absolutely insane but beautiful. Who wouldn't love a giant Parisian ship pompadour print?
Naturally, I jumped on the chance to get a little bit of a whole line. I had grand visions of making a quilt with just this line (something I never do and feels very exotic to me), but the longer I look at all these crazy prints together, the less convinced I am that I'm in love.
And I've already got a Staple dress that I made from the navy deer print, but that pink one above makes my brain hurt.
So now I have to decide whether I want to abandon my plan to make one quilt out of all these, or to scrap the original plan and come up with a new quilt idea.
The original plan was to make the cover quilt from Dana's Imagine Quilts. I was thinking of using some dark grey sashing and maybe a navy background for the round bits. But I'm not sure I want to put all the effort into those curved seams if I'm not sure I'll absolutely love the result.
My other thoughts are to do a Sparkle Punch quilt a la Oh Fransson! Or maybe a plus quilt similar to this one from Film in the Fridge. Both are fairly simple and quick to make, and would break up the prints so they aren't so in your face.
Anyone have any thoughts? I'm pretty open to suggestions at this point because I want to get this done so I like the fabric again!
Friday, September 26, 2014
Friday Finish: Round Trip Quilts!
Remember back during the summer when I joined the New Blogger's Blog Hop hosted by Plum and June? A few of those bloggers joined up to make the Round Trip Quilts round robin bee. I've already send my center out to Chelsea at Patch the Giraffe, and I'm super excited to see what she does with it.
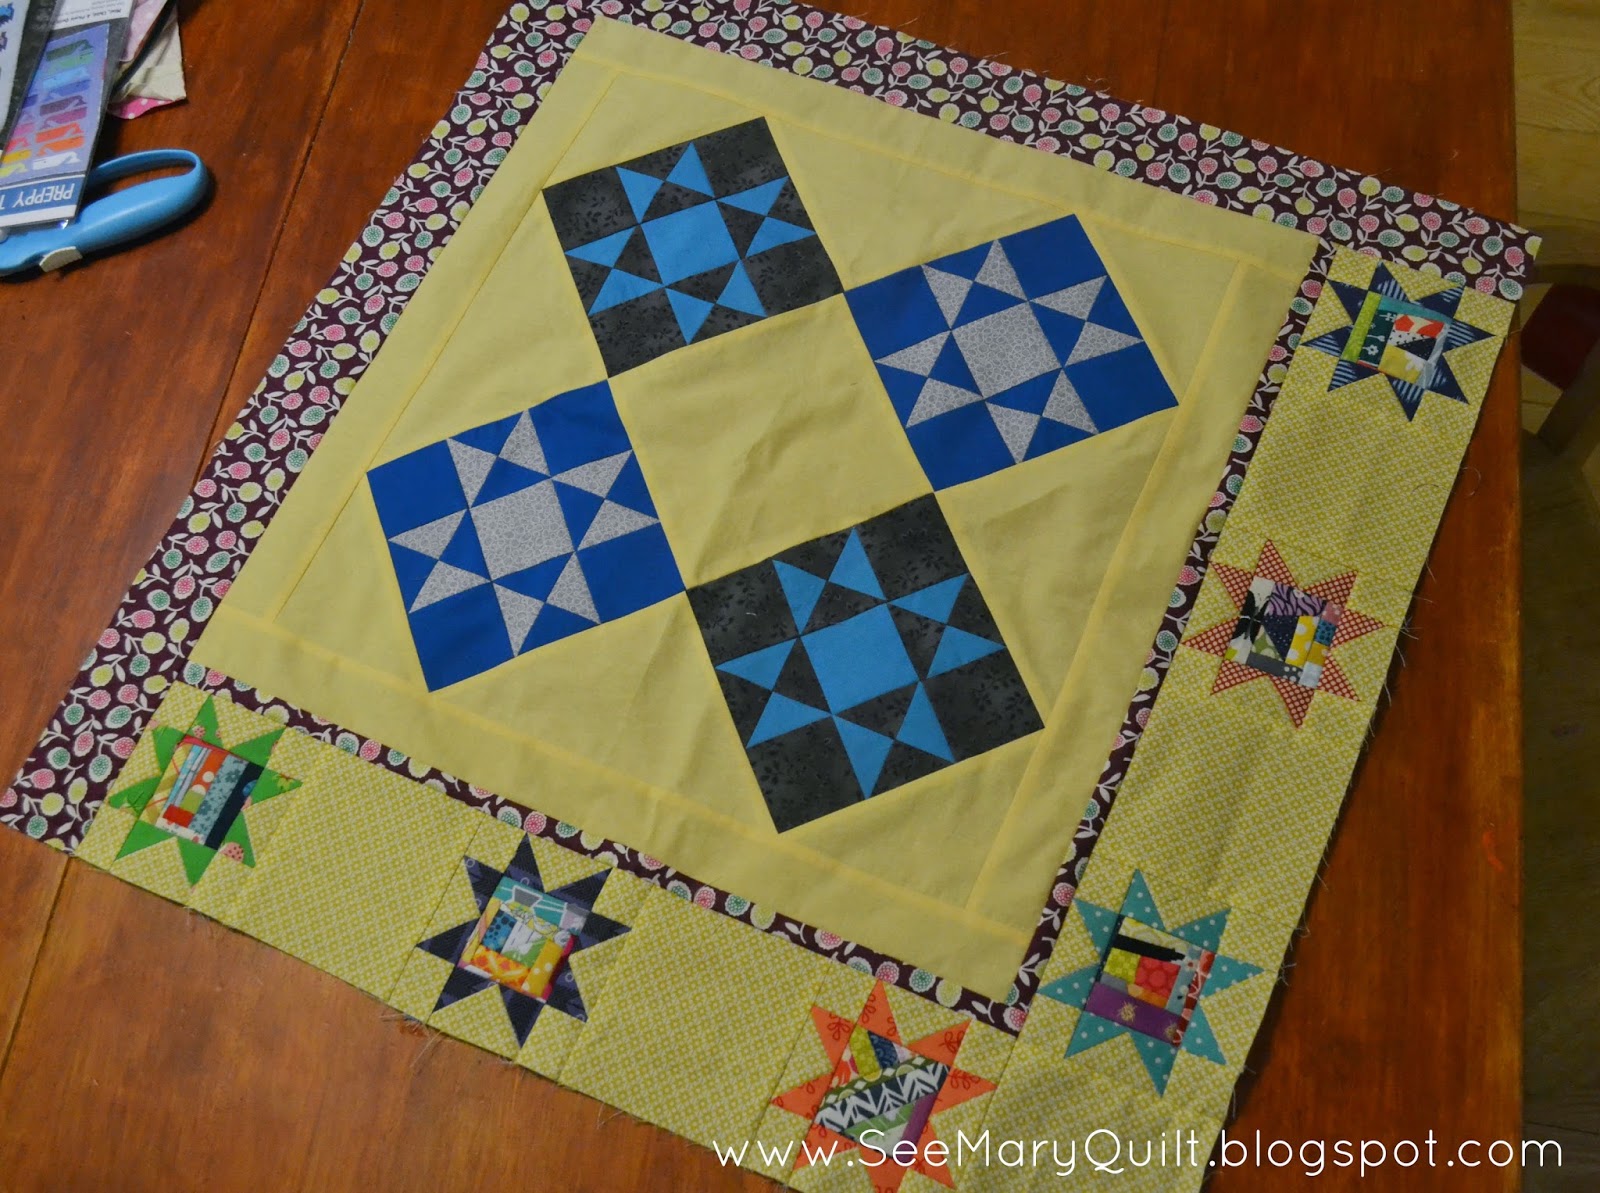
This center (the four blue/grey stars on yellow) was started by Leanne at Devoted Quilter, and I was a bit stumped by it at first. As part of our package, we sent along notebooks with notes about our likes, dislikes, ideas for the quilts, etc., and Leanne said she wanted us to just do our thing and not to be scared of using any colors or prints, but to keep it stars.
So I knew I wanted to add a lot of color, partly because that's my thing, but also so it doesn't stick to one color scheme too early in the quilt. I decided to do tiny little stars along two sides, but was pondering how to add more than six colors/prints, when my friend suggested I do some Victoria Findlay Wolfe-esque centers. Normally, I wouldn't throw that much crazy at a quilt that wasn't mine, but I figured in such small amounts, it would be perfect.
I pieced the centers out of my tiniest scraps, then trimmed them down to 2.5 inches. Then made flying geese for the points and trimmed them down to 2.5 inches wide. It was a challenge working with such small pieces, but sewing bigger and trimming down made it a lot more accurate.
I'll be sending this one off to Chelsea as soon as I can get to the post office. And soon I'll be getting Jennifer's (of Never Just Jennifer) center. I was in love with it from the start and can't wait to see it in real life.
Here's the bloggers in the group!
Heather at QA CreationsLeanne at Devoted QuilterKim at Ties That Bind QuiltingLiz at Green Cheese QuiltingMary at See Mary QuiltChristina at WIPs and TutsJennifer at Never Just JenniferChelsea Huckins at Patch the Giraffe
Linking up with Amanda Jean for Finish It Up Friday and Glory Be Quilter for TGIFF!

Wednesday, September 24, 2014
New Toys: Mini Hex N More Ruler
So I work in a fabric store. It's pretty much like being told you have to browse for eight hours before spending any money. There's a lot that I want, and my wish list just gets longer every time we get new bolts of fabric in, but I'm trying to not blow every paycheck the second I get it.
And in the spirit of spending smaller amounts of money, I got the Mini Hex N More ruler. I get to see how I like it before buying the regular sized rulers, because those are obviously on the wishlist too. And I figured it would be perfect for cutting out mini hexies for some EPP that I might get around to someday.
After storing the ruler in my bag for a couple weeks (read: it's so little I completely lost it) I finally pulled out my box of medium-sized scraps and decided to see if I could put together some pinwheels.
Cutting with such a little ruler wasn't as bad as I thought it might be. I had a little snafu and cut the wrong sized triangles. I tried to fix it by making some very scant seams, but the damage was done. I tried some creative pulling and stretching and pressing, but I just ended up with bulgy centers. They did come together fast though, so that was a win.
Here's the next batch of pinwheel parts, now with the proper triangles, ready to go. I think the first set will get quilted to death and maybe made into a pouch or book cover. And after this, I think I'll make a mini out of little hexies and triangles.
Linking up with Lee for WIP Wednesday and Kelly for Needle and Thread Thursday!
Friday, September 19, 2014
Friday Finish: Robotic Buzz-saw Baby Quilt
Anyway, I blew a gift card a while back on a couple books that had just come out. One was Amy Smart's Fabulously Fast Quilts. I'm really pleased with that decision, because a week later I realized that I had nothing to send a friend for their baby shower. And this Buzz-saw pattern was one of my favorite sneaky short cuts in the book, so perfect time to try it out.
I absolutely loved this pattern. I had all the blocks sewn up in a day, plus some extras that I decided to cut out. Day two, was putting them all together and making binding. And the quilting was a short evening of sewing with friends. I used a new quilting pattern, a squared loop, which is perfect with the graph paper print.
This also turned out to be a great idea I had, because this fabric is the softest, most buttery, heaven to work with fabric. It presses so well, and crinkled into the cuddliest quilt. I really want to buy all Birch and clothe myself in it. (for real guys.)
One of the most fun parts was making the label. I knew, as a baby quilt, this would get washed a hundred times, and a fabric marker might fade or bleed. And since I'm not usually a label person, I got really nervous that whatever I picked would be the wrong marker, and again, had no time for testing every marker in the store.
So, I just decided to pull out the embroidery floss and stitched up a label. I absolutely love it, because I got to color-match my thread to the fabric. And, I'm pretty sure that the floss will lose it's color about the same time as the fabric disintegrates.
This quilt did make it to the shower, and with a few days to spare. It has yet to meet it's owner, but I know it will be loved.
Linking up with Amanda Jean for Finish It Up Friday and Lorna for TGIFF!

Monday, September 15, 2014
Knitting and Stitching Things!
There's so much sewing happening here, I just don't have enough pictures to show you all of it! I need a live in photographer, or maybe just a remote shutter control. The latter is probably cheaper to maintain.
In the meantime, here's some progress on my mermaid. See that little bit of red across her face? Yep, that's it. But I did manage to get the rest of the colors I was missing for this, so I can just sit down and finish her now.
And while I was shopping for the last of my colors, I decided to just buy another thread organizer and more plastic cards to wind the thread. I have one of these somewhere absolutely stuffed with thread, but cannot find it. It's extra large, so will take a bit longer to fill, but I still have a bunch of floss tucked away in baggies and drawers just waiting to be wound.
And I finally started on some holiday crafting. Half of our extended family celebrates Christmas on Thanksgiving, so it tends to sneak up on me. Hopefully this year I won't be binding and burying threads on the drive down to Connecticut.
What are your holiday crafting plans? I usually make a big list then realize I should have started months earlier!
And you have one more day to head over to Quilty Habit to vote for your favorite Orange Peel Quilt-a-Long quilt. I'm partial to mine, but there's a lot of great choices!
Subscribe to:
Posts (Atom)